Website integration
Quick setup in dashboard
You can find all integration options directly in your Trustify Dashboard under Apps → Integrations. There, you can also use an easy configurator to generate the widget setup quickly.
This guide explains how to integrate Trustify widgets into your website to build trust and increase conversions. You can customize each widget and place it exactly where it fits best. In addition to embedding widgets, we recommend actively collecting new customer reviews.
All Trustify widgets:
- Improve your SEO
- Support multiple languages with automatic language detection
- Support light and dark mode (including auto-detection)
- Are optimized for fast loading
- Are responsive on all devices
- Are easy to customize
To display widget content, replace your-profile-slug with your own slug:
https://in.trustify.ch/[your-profile-slug]
Trustify Widget - Bar
The bar widget appears at the bottom of your website above the page content. 
Live preview: https://cdn.trustify.ch/widgets/v2/bar
Integrate the widget
Add this stylesheet inside the
<head>tag:<link rel="stylesheet" href="https://cdn.trustify.ch/widgets/v2/css/bar.css">Add this code inside the
<body>tag on the page where you want to show the widget:<div id="trustify-bar" class="trustify-bar" data-profile="your-profile-slug" data-closable="true" data-default-lang="en" data-autodetect-lang="true" data-seo="true" data-autodetect-mode="false" data-mode="light" data-logo-icon="false"> </div> <script src="https://cdn.trustify.ch/widgets/v2/js/bar.js"></script>If you insert this into a global layout file, the widget will load on all pages.
Replace
your-profile-slugwith your Trustify profile slug.
Customize the widget
The HTML from step 2 contains data attributes you can use to customize the widget.
| Attribute | Description |
|---|---|
| data-profile | Defines which Trustify profile is loaded (your profile slug). |
| data-closable | Defines whether users can close the bar. Values: true or false. |
| data-default-lang | Sets the default language. Values: en, de, fr. |
| data-autodetect-lang | Enables browser language detection. Values: true or false. |
| data-seo | Enables SEO optimization output. Values: true or false. If you use multiple widgets on one page, enable this on only one widget. |
| data-autodetect-mode | Enables automatic light/dark mode detection. Values: true or false. Use this only if your website also switches mode automatically. |
| data-mode | Sets the mode manually. Values: light or dark. |
| data-logo-icon | Shows the icon logo instead of the full logo. Values: true or false. |
Trustify Widget - Badge
The badge widget appears at the bottom left or bottom right of your website above the page content. ![]()
Live preview: https://cdn.trustify.ch/widgets/v2/badge
Integrate the widget
Add this stylesheet inside the
<head>tag:<link rel="stylesheet" href="https://cdn.trustify.ch/widgets/v2/css/badge.css">Add this code inside the
<body>tag on the page where you want to show the widget:<div id="trustify-badge" class="trustify-badge" data-profile="your-profile-slug" data-closable="true" data-default-lang="en" data-autodetect-lang="true" data-seo="true" data-autodetect-mode="false" data-mode="light" data-logo-icon="false" data-position="right"> </div> <script src="https://cdn.trustify.ch/widgets/v2/js/badge.js"></script>If you insert this into a global layout file, the widget will load on all pages.
Replace
your-profile-slugwith your Trustify profile slug.
Customize the widget
The HTML from step 2 contains data attributes you can use to customize the widget.
| Attribute | Description |
|---|---|
| data-profile | Defines which Trustify profile is loaded (your profile slug). |
| data-closable | Defines whether users can close the badge. Values: true or false. |
| data-default-lang | Sets the default language. Values: en, de, fr. |
| data-autodetect-lang | Enables browser language detection. Values: true or false. |
| data-seo | Enables SEO optimization output. Values: true or false. If you use multiple widgets on one page, enable this on only one widget. |
| data-autodetect-mode | Enables automatic light/dark mode detection. Values: true or false. Use this only if your website also switches mode automatically. |
| data-mode | Sets the mode manually. Values: light or dark. |
| data-logo-icon | Shows the icon logo instead of the full logo. Values: true or false. |
| data-position | Sets the badge position. Values: right or left. |
Trustify Widget - Seal
The seal widget appears exactly where you place it in your page markup. 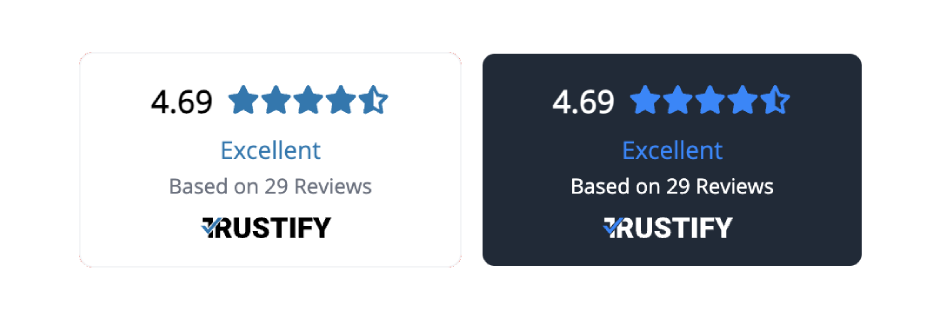
Live preview: https://cdn.trustify.ch/widgets/v2/seal
Integrate the widget
Add this stylesheet inside the
<head>tag:<link rel="stylesheet" href="https://cdn.trustify.ch/widgets/v2/css/seal.css">Add this script inside the
<body>tag:<script src="https://cdn.trustify.ch/widgets/v2/js/seal.js"></script>Place this HTML at the exact position where you want the seal widget to appear:
<div id="trustify-seal" class="trustify-seal" data-profile="your-profile-slug" data-default-lang="en" data-autodetect-lang="true" data-seo="true" data-autodetect-mode="false" data-mode="light" data-logo-icon="false" data-bg-transparent="false" data-no-border="false"></div>Replace
your-profile-slugwith your Trustify profile slug.
Customize the widget
The HTML from step 3 contains data attributes you can use to customize the widget.
| Attribute | Description |
|---|---|
| data-profile | Defines which Trustify profile is loaded (your profile slug). |
| data-default-lang | Sets the default language. Values: en, de, fr. |
| data-autodetect-lang | Enables browser language detection. Values: true or false. |
| data-seo | Enables SEO optimization output. Values: true or false. If you use multiple widgets on one page, enable this on only one widget. |
| data-autodetect-mode | Enables automatic light/dark mode detection. Values: true or false. Use this only if your website also switches mode automatically. |
| data-mode | Sets the mode manually. Values: light or dark. |
| data-logo-icon | Shows the icon logo instead of the full logo. Values: true or false. |
| data-bg-transparent | Makes the seal background transparent. Values: true or false. |
| data-no-border | Hides the seal border. Values: true or false. |
Trustify Widget - Micro
The micro widget appears exactly where you place it in your page markup. 
Live preview: https://cdn.trustify.ch/widgets/v2/micro
Integrate the widget
Add this stylesheet inside the
<head>tag:<link rel="stylesheet" href="https://cdn.trustify.ch/widgets/v2/css/micro.css">Add this script inside the
<body>tag:<script src="https://cdn.trustify.ch/widgets/v2/js/micro.js"></script>Place this HTML at the exact position where you want the micro widget to appear:
<div id="trustify-micro" class="trustify-micro" data-profile="your-profile-slug" data-seo="true" data-autodetect-mode="false" data-mode="light" data-bg-transparent="false" data-no-border="false"></div>Replace
your-profile-slugwith your Trustify profile slug.
Customize the widget
The HTML from step 3 contains data attributes you can use to customize the widget.
| Attribute | Description |
|---|---|
| data-profile | Defines which Trustify profile is loaded (your profile slug). |
| data-seo | Enables SEO optimization output. Values: true or false. If you use multiple widgets on one page, enable this on only one widget. |
| data-autodetect-mode | Enables automatic light/dark mode detection. Values: true or false. Use this only if your website also switches mode automatically. |
| data-mode | Sets the mode manually. Values: light or dark. |
| data-bg-transparent | Makes the micro widget background transparent. Values: true or false. |
| data-no-border | Hides the micro widget border. Values: true or false. |
Trustify Widget - Grid
The grid widget appears exactly where you place it and displays multiple reviews in a grid layout. 
Live preview: https://cdn.trustify.ch/widgets/v2/grid
Integrate the widget
Add this stylesheet inside the
<head>tag:<link rel="stylesheet" href="https://cdn.trustify.ch/widgets/v2/css/grid.css">Add this script inside the
<body>tag:<script src="https://cdn.trustify.ch/widgets/v2/js/grid.js"></script>Place this HTML at the exact position where you want the grid widget to appear:
<div id="trustify-grid" class="trustify-grid" data-profile="your-profile-slug" data-cols="3" data-limit="15" data-mode="light" data-autodetect-mode="false" data-default-lang="en" data-autodetect-lang="false" data-seo="false" data-auto-width="false" data-no-border="false" data-bg-transparent="false"></div>Replace
your-profile-slugwith your Trustify profile slug.
Customize the widget
The HTML from step 3 contains data attributes you can use to customize the widget.
| Attribute | Values | Description |
|---|---|---|
| data-profile | profile slug | Defines which Trustify profile is loaded. |
| data-cols | 1–4 | Sets how many columns are shown in the grid. |
| data-limit | 1–50 | Limits the number of reviews displayed. |
| data-mode | light / dark | Sets the widget color mode manually. |
| data-autodetect-mode | true / false | Detects and applies the website's light/dark mode automatically. |
| data-default-lang | en / de / fr | Sets the fallback language if auto-detection is not used. |
| data-autodetect-lang | true / false | Detects and applies the visitor's browser language automatically. |
| data-seo | true / false | Enables SEO optimization output. Enable on only one widget per page. |
| data-auto-width | true / false | Automatically adapts widget width to the parent container. |
| data-no-border | true / false | Hides the widget border. |
| data-bg-transparent | true / false | Makes the widget background transparent. |
Trustify Widget - Slider
The slider widget appears exactly where you place it and displays reviews in a carousel. 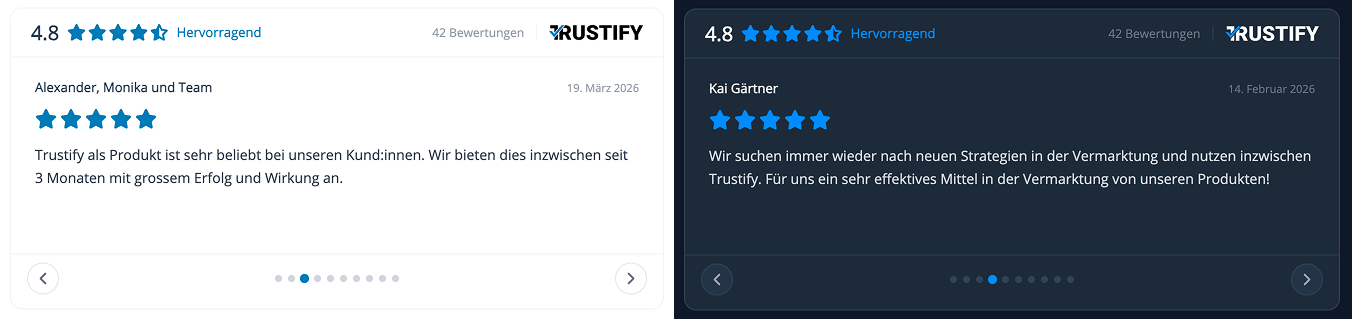
Live preview: https://cdn.trustify.ch/widgets/v2/slider
Integrate the widget
Add this stylesheet inside the
<head>tag:<link rel="stylesheet" href="https://cdn.trustify.ch/widgets/v2/css/slider.css">Add this script inside the
<body>tag:<script src="https://cdn.trustify.ch/widgets/v2/js/slider.js"></script>Place this HTML at the exact position where you want the slider widget to appear:
<div id="trustify-slider" class="trustify-slider" data-profile="your-profile-slug" data-limit="10" data-mode="light" data-autodetect-mode="false" data-default-lang="en" data-autodetect-lang="false" data-autoplay="false" data-autoplay-speed="4000" data-seo="false" data-auto-width="false" data-no-border="false" data-bg-transparent="false"></div>Replace
your-profile-slugwith your Trustify profile slug.
Customize the widget
The HTML from step 3 contains data attributes you can use to customize the widget.
| Attribute | Values | Description |
|---|---|---|
| data-profile | profile slug | Defines which Trustify profile is loaded. |
| data-limit | 1–20 | Limits the number of reviews displayed. |
| data-mode | light / dark | Sets the widget color mode manually. |
| data-autodetect-mode | true / false | Detects and applies the website's light/dark mode automatically. |
| data-default-lang | en / de / fr | Sets the fallback language if auto-detection is not used. |
| data-autodetect-lang | true | Detects and applies the visitor's browser language automatically. |
| data-autoplay | true / false | Enables automatic slider movement. |
| data-autoplay-speed | ms (min 1000) | Sets autoplay interval in milliseconds. |
| data-seo | true / false | Enables SEO optimization output. Enable on only one widget per page. |
| data-auto-width | true / false | Automatically adapts widget width to the parent container. |
| data-no-border | true / false | Hides the widget border. |
| data-bg-transparent | true / false | Makes the widget background transparent. |